Dynamic Island (and Live Activities): Quick start tutorial
All the steps you need to start creating your own Dynamic Island UIs!
Published: Sept. 17, 2022 SponsoredDiscover new games to play, organize your library, read reviews and more.
Before we get started with the tutorial, you need at least Xcode 14.1 Beta or later to be able to use the newest APIs.
Note that is not meant to be an exhaustive guide but rather the minimal setup required for you to start playing around with Dynamic Island 🏝 on your own!
Widgets extension and project setup
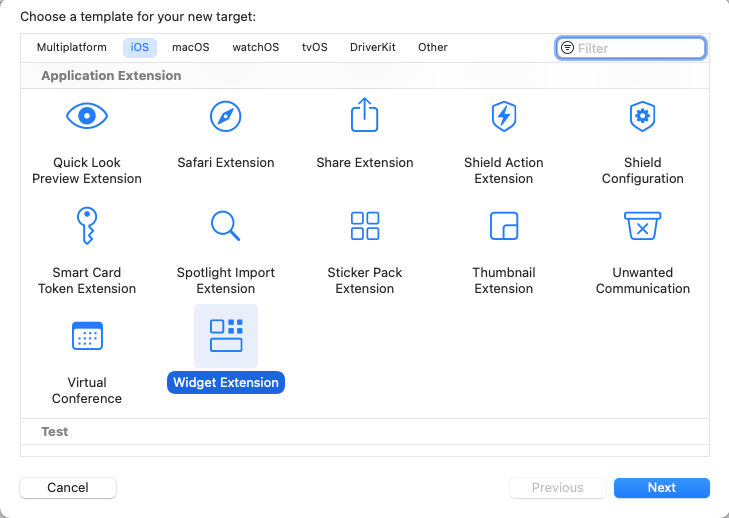
Dynamic Island is part of Live Activities API, which is part of the Widgets system. If your project doesn’t have a widget extension yet, start by adding a new target to your project and select “Widget Extension”.
The following important part is to configure your project for Live Activities. This is done via Info.plist file.
Important: This need’s to be your main app Info.plist not the one from the widget extension.
Add this key: NSSupportsLiveActivities or start typing “Supports” and it will autocomplete it. This key needs to be type bool and set to YES.
Define your Live Activities
Create a new Swift file and name it for example, LiveActivityAttributes. You need to set the “Target Membership” for your app and also the widgets extension.
Next, we will define a simple struct containing the data we want to have available in the Live Activity and Dynamic Island.
I am going to use a simple timer as an example:
public struct TimerAttributes: ActivityAttributes {
    public typealias TimeState = ContentState

    public struct ContentState: Codable, Hashable {
        // We dont need dynamic data
    }

    var endDate: Date
}
Because the endDate is static data, we will set it once the activity starts. It does not need to be part of the ContentState struct.
Create the views
Now we can move to the widgets extension and define our widget for the Live Activity and Dynamic Island. Since Dynamic Island is not available on all phones, these things go hand in hand.
We can prepare the following template for our UI:
struct TimerActivityWidget: Widget {
    var body: some WidgetConfiguration {
        ActivityConfiguration(for: TimerAttributes.self) { context in
            // This is the live activity view
                Text(context.attributes.endDate, style: .timer)
                    .padding()
         } dynamicIsland: { context in

            DynamicIsland {
                    // This content will be shown when user expands the island

                DynamicIslandExpandedRegion(.center) {
                        Text(context.attributes.endDate, style: .timer)
                }

            } compactLeading: {
                // When the island is wider than the display cutout
            } compactTrailing: {
               // When the island is wider than the display cutout
                    Image(systemName: "timer")
            } minimal: {
               // This is used when there are multiple activities
                    Image(systemName: "timer")
            }
        }
    }
}
With this ready, you can start building your UI. I recommend checking out official Apple docs that explain how Dynamic Island UI works.
Start your Live Activity
To bring Dynamic Island or Live Activity to life, you need to start it. Since we already did the hard work, this last step is pretty simple because this example is as simple as I could make it.
Start by importing ActivityKit.
Then you can start the activity like this:
let attributes = TimerAttributes(endDate: Date().addingTimeInterval(60 * 60))

do {
    _ = try Activity<TimerAttributes>.request(attributes: liveActivityAttributes, contentState: .init())
} catch {
    print(error.localizedDescription)
}
Once this code runs (without errors), your live activity is running, and when you exit from the app, the animation should hint that your app “moved” to the Dynamic Island if you are on the device that supports this. It works pretty good in the Simulator.
You will also see Live Activity at the bottom of your Lock Screen.
To end the activity, you can call:
Task {
     for activity in Activity<TimerAttributes>.activities {
        await activity.end(dismissalPolicy: .immediate)
     }
}
Code examples
Looking for even faster start? Check out this GitHub repo by Jordi Bruin that is constantly being updated with examples.
Follow on Bluesky to not miss new posts

iOS blogger and developer with interest in Python/Django.