How to setup CloudKit subscription to get notified for changes
CloudKit subscription offers best way to keep data up-to-date for your user. I will show you the simplest setup to get started in this cloudkit subscriptions tutorial.
Published: June 27, 2020 SponsoredDiscover new games to play, organize your library, read reviews and more.
I have recently implemented with (some trial & error) working CKQuerySubscription so my Apple TV app can get notified when content changes based on new user actions in iOS app.
I want to present the simplest possible example because that means the least amount of things that can go wrong and issues are easier to diagnose and fix. Once you have the basics running you can modify it, and when it does not work you can be reasonably sure that the problem lies in the new code since the foundation was already working.
We are going to use CKQuerySubscription that can notify us when CloudKit records change. This can mean either record update, new record, deleted record..
There are basically two parts for getting this working for one direction. You need to create the subscription, save it to the iCloud and it will then be run automatically when changes happen.
Creating a subscription
Let's see how to create basic subscription first. Your project needs to have iCloud capability enabled and after that you can create instance of CKContainer with the identifier from your project settings.
We can then grab the private database:
let db = container.privateCloudDatabase
And then start creating our subscription:
let newSubscription = CKQuerySubscription(recordType: "Record", predicate: NSPredicate(value: true), options: [.firesOnRecordCreation, .firesOnRecordDeletion])
Replace the "Record" with the name of your CloudKit record you want to observer. Here I am using simple true predicate which will match all records. You can customize this to only get notified when particular records are changed.
The options lets us specify what kind of changes we want to be notified about. In this case I only care about new records (firesOnRecordCreation) and deletions (firesOnRecordDeletion).
Next we need to specify what kind of notification we want to receive, otherwise we would get an error trying to save the subscription to the iCloud.
let notification = CKSubscription.NotificationInfo()
notification.shouldSendContentAvailable = true

newSubscription.notificationInfo = notification
Since I am only interested in silent push notifications that don't display anything to the user, I only need to set the shouldSendContentAvailable property.
Saving subscription
The next step is to save this subscription to iCloud:
db.save(newSubscription) { (subscription, error) in
     if let error = error {
          print(error)
          return
     }

     if let _ = subscription {
          print("Hurrah! We have a subscription")
     }
}
If you want to have just a single subscription it may be a good idea to save (into UserDefaults maybe) that subscription is created so you can avoid creating it next time.
Check existing subscriptions
You can also fetch all existing subscriptions like so:
db.fetchAllSubscriptions { (subscriptions, error) in
}
Regarding this subscription there is one last step. It should not be necessary for running in a debug but without it my subscription just did not trigger any notifications.
Deploying with CloudKit Dashboard
You first need to run the above code to create the subscription in the iCloud database, then log into CloudKit dashboard and deploy these changes to Production environment.
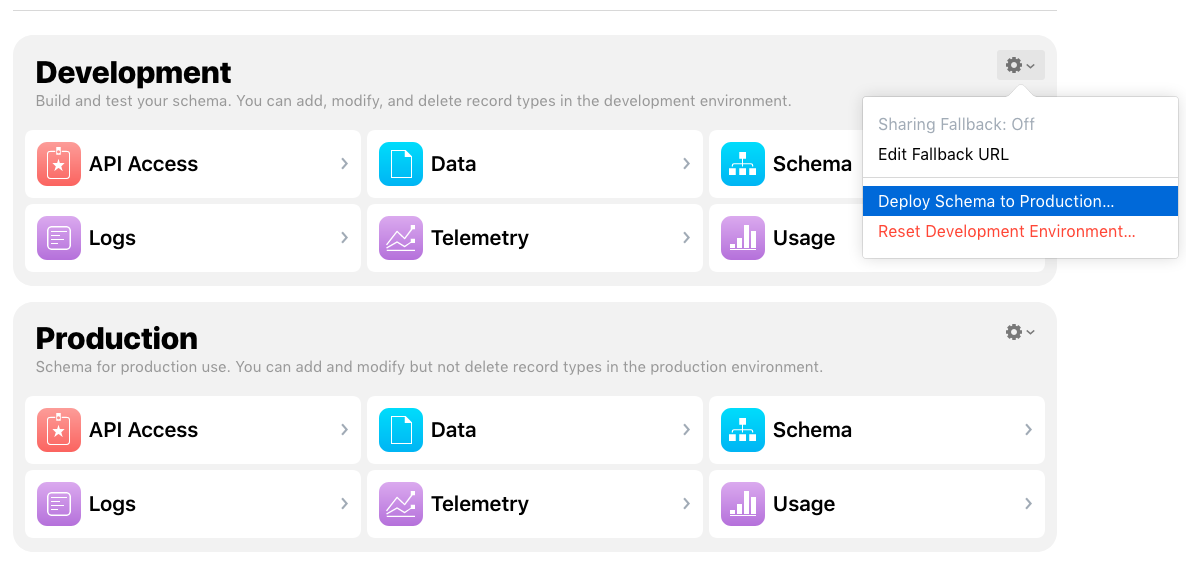
As soon as I did this when troubleshooting the issue it all started working fine.
Receiving CloudKit notifications
Our subscription is ready and we can setup the other part which is to receive notification when records change.
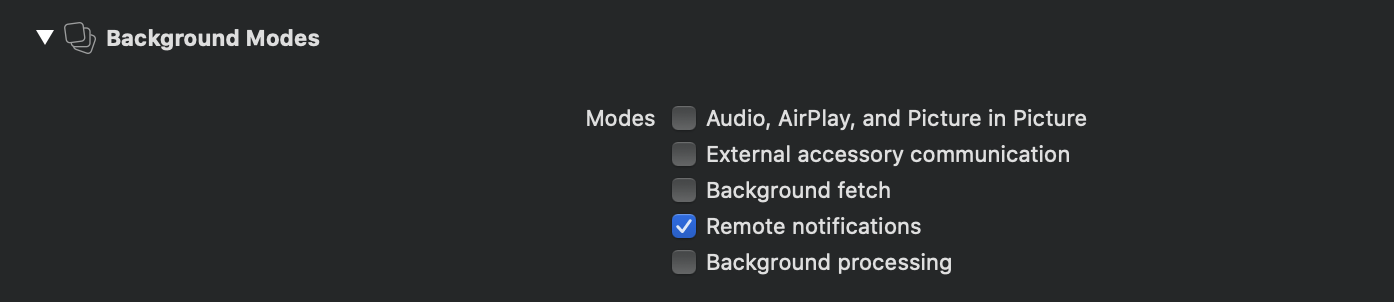
This is done via the standard remote notifications so your project needs to have Background Tasks enabled in capabilities and checked the option "Remote notifications".
The next step is to register your app for remote notifications like this:
func application(_ application: UIApplication, didFinishLaunchingWithOptions launchOptions: [UIApplication.LaunchOptionsKey: Any]?) -> Bool {
    // Override point for customization after application launch.

    UIApplication.shared.registerForRemoteNotifications()

    return true
}
CloudKit notifications may be configured to display the standard banner in which case you would first need a user's permission to display them. Since we are using silent notifications we don't need that.
And next setup method to be called when notification arrives:
func application(_ application: UIApplication, didReceiveRemoteNotification userInfo: [AnyHashable : Any], fetchCompletionHandler completionHandler: @escaping (UIBackgroundFetchResult) -> Void) {
}
Getting CKNotification
Here we can try to create instance of CKNotification from the userInfo to validate that this is indeed CloudKit talking to us and get additional information. If you have only CloudKit remote notifications and don't care about the content then you can skip a lot of these steps.
if let notification = CKNotification(fromRemoteNotificationDictionary: userInfo) {
    print("CloudKit database changed")
    NotificationCenter.default.post(name: .cloudKitChanged, object: nil)
    completionHandler(.newData)
    return
}
Here in this example I am using NotificationCenter to notify my app about the changes. It is also very important to call completionHandler in this method. If the above fails for some reason then I am calling just:
completionHandler(.noData)
And this is basic CloudKit subscription finished. It lets us observe changes in the CloudKit database and react.
For simple use cases this is enough and it has just a few bits that can go wrong 🙂. If you wanted something more advanced then you need better system of managing subscriptions than just saving bool flag to UserDefaults and you can also look into predicates to not be notified about all the changes.
There is also the option to have the subscription fire once and then be deleted which can be useful and doesn't have to be managed.
Uses: Xcode 11 & Swift 5
Follow on Bluesky to not miss new posts

iOS blogger and developer with interest in Python/Django.