UIMenu: Comprehensive guide
Learn how to use UIMenu to build modern UI. This tutorial shows basic example, how to add separator, how to work with submenus and more.
Published: March 7, 2021 SponsoredDiscover new games to play, organize your library, read reviews and more.
UIMenu is super versatile component, which looks modern, has cool animations and a lot of customization options.
Basic UIMenu
Let's start with basic menu, which we can then build on. Because the UIMenu is also used on a Mac, there are things we will just ignore. I will point these out.
Before we can create a menu, we need some items to display in it. These are the UIMenuElement type. This is sort of an umbrella type to cover all the things that can be menu element.
In our case this will be mostly UIAction but UIMenu is also considered UIMenuElement. But let's not get ahead of ourselves.
Also key thing to remember is that we are not showing UIMenu similarly to UIAlertController with the present method. Instead we define in advance, when menu should be shown. We will get to this later.
Defining UIAction for menus
We can create basic menu item like this:
let refreshItem = UIAction(title: "Refresh", image: UIImage(systemName: "arrow.clockwise")) { (_) in
     // handle refresh
}
The init takes many parameters, but only title and handler are required. SF Symbols work great here and most of my menu items have SF Symbol set.
With the first menu item ready, we can create UIMenu
let menu = UIMenu(title: "Options", children: [refreshItem])
Once again the init takes many parameters, but they are optional. There is identifier which is used on a Mac to specify if the menu is one of the system standard ones like "File", "Edit" and others.
Curiously we can also specify image and options which are type of UIMenu.Options. They won't do anything in this case and we will cover these later.
Let's create second action and see what the menu looks like.
let deleteItem = UIAction(title: "Delete", image: UIImage(systemName: "trash"), attributes: .destructive) { (_) in
            // delete item
 }
Here we are also using the attributes parameter to indicate destructive action. This makes the text and icon red. You can also use .disabled to indicate that some option is currently disabled.
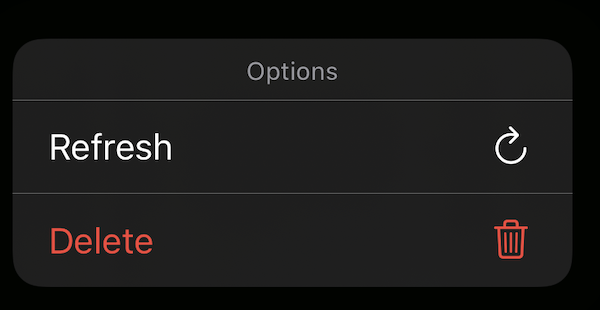
With the new action prepared, we can update the menu and see how it looks.
let menu = UIMenu(title: "Options", children: [refreshItem, deleteItem])
And this is our menu in action:
UIMenu with separators and submenus
Let's move to more advanced stuff. You can't actually specify separators, but you get these automatically if you create submenu. We will use the one we have and modify it.
We can prepare additional items:
let favoriteAction = UIAction(title: "Favorite", image: UIImage(systemName: "star")) { (_) in
}
let editAction = UIAction(title: "Edit", image: UIImage(systemName: "pencil")) { (_) in
}
And then the actual menu.
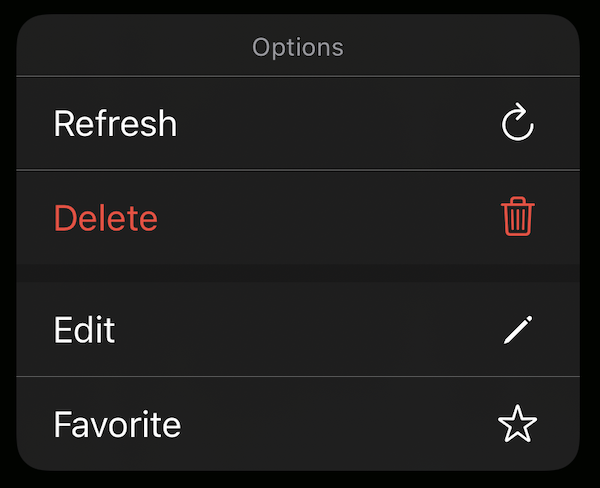
let submenu = UIMenu(title: "", options: .displayInline, children: [favoriteAction, editAction])
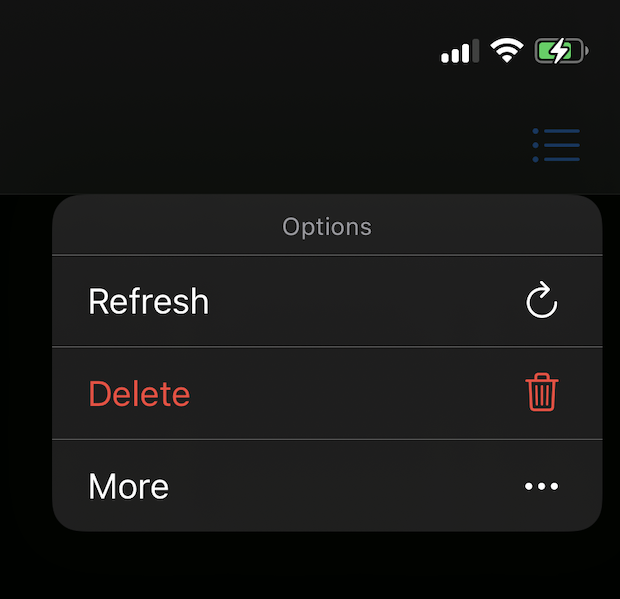
let menu = UIMenu(title: "Options", children: [deleteItem, refreshItem, submenu])
Notice we are making use of the options parameter to specify we want this menu to be inlined. And this is what we get:
If we don't specify the .displayInline then the menu will be nested and we need to provide title and ideally image so the appearance is same as with the standard items.
Here is an example:
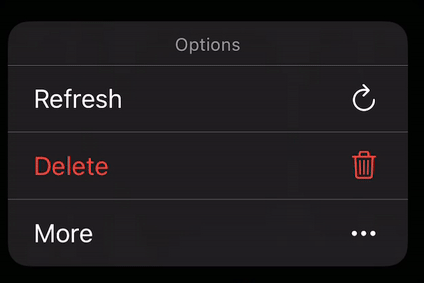
let submenu = UIMenu(title: "More", image: UIImage(systemName: "ellipsis"), children: [favoriteAction, editAction])

let menu = UIMenu(title: "Options", children: [submenu, deleteItem, refreshItem])
And this is the result:
If you wanted to indicate that this menu contains destructive options, you can use .destructive for the options parameter.
UIAction and state
When creating UIAction we can also specify the state parameter. You can set it to .off, .on and .mixed.
I found that only .on makes sense to indicate option that is active. It will have checkmark before the text. In my testing .mixed did the same.
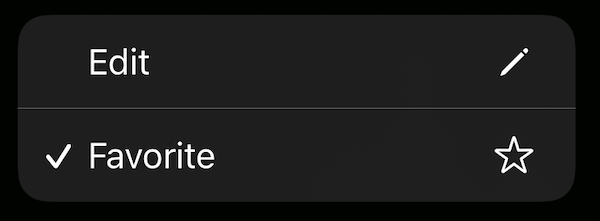
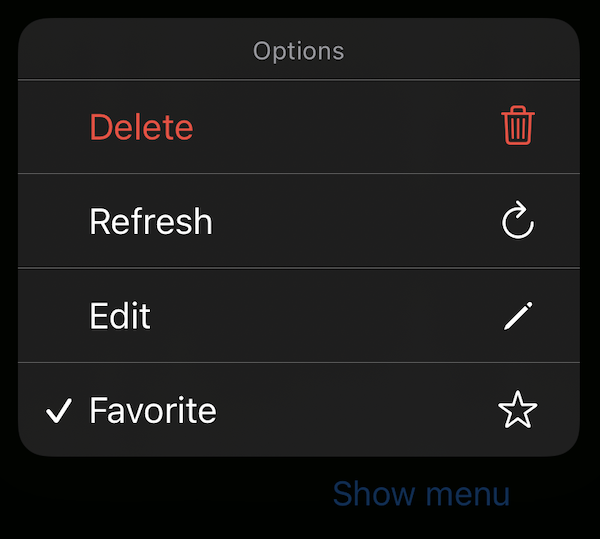
Here is our submenu with favorite action state set to .on:
let favoriteAction = UIAction(title: "Favorite", image: UIImage(systemName: "star"), state: .on) { (_) in
}
And result:
Where UIMenu makes sense?
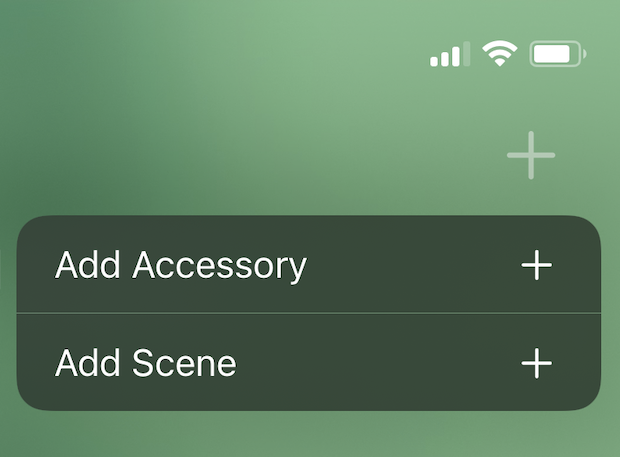
Before we get into showing menus to the user, let's look at where we might actually want this. I think nav bar is where menus can make a lot of sense, because there is limited space. For example if user can create more than one "thing", you would have like a "+" button which would open new menu for the actual selection.
Apple Home app does this for example.
Or if you have simple sorting, you can use UIMenu to let user select by what items should be sorted.
Just keep in mind that the menu will always disappear when user makes a choice. I think it is also great alternative to the swiping actions we used in TableViews. Both TableView and CollectionView support these menus natively. And you get a cool animation as a bonus.
How to show UIMenu
We went over creating various types with menus with different attributes, states and more.
Let's see how to actually display these menus to the user. Since iOS 13 we could show UIMenu from the TableView or CollectionView cells and since iOS 14 we can also use UIBarButtonItem and plain UIButton.
Showing from UIBarButtonItem
I think presenting menu from UIBarButtonItem will be pretty frequent use-case, so let's start with it. When creating those in code, you can use new initializer, which takes menu as one of the parameters.
navigationItem.rightBarButtonItem = UIBarButtonItem(title: nil, image: UIImage(systemName: "list.bullet"), primaryAction: nil, menu: menu)
The primary action is of type UIAction. When you pass nil, the menu will be the primary action of this bar button item. If you pass primaryAction then the menu will be displayed only after long-pressing the button.
If you are creating more standard UIBarButtonItem, then there is this init available:
UIBarButtonItem(systemItem: .edit, primaryAction: nil, menu: menu)
And here is the result:
Adding UIMenu to UICollectionViewCell
Another useful place to show the menu, is from collection view cells as mentioned. This way you can offer a way for the user to delete item, favorite it and more without needing to going into detail screen or having the buttons on the cell itself.
There are two short steps to enable this. First you need to conform to the UICollectionViewDelegate.
And then implement this method:
func collectionView(_ collectionView: UICollectionView, contextMenuConfigurationForItemAt indexPath: IndexPath, point: CGPoint) -> UIContextMenuConfiguration? {

}
Based on the provided indexPath you can decide whether to show menu or not. If you don't want to show menu, simply return nil.
If you want to show the menu, you can return something like this:
return UIContextMenuConfiguration(identifier: nil, previewProvider: nil, actionProvider: { _ in
   return UIMenu(title: "Options", children: [share, copy, delete])
})
And then you get this cool animation and UIMenu when long-pressing collection view cell. This example is from my open source project on GitHub.
Adding UIMenu to UITableViewCell
The process for TableView is basically the same. You need to conform to the UITableViewDelegate and then implement this method:
func tableView(_ tableView: UITableView, contextMenuConfigurationForRowAt indexPath: IndexPath, point: CGPoint) -> UIContextMenuConfiguration? {

}
Showing UIMenu from UIButton
The last option for presenting UIMenu is from UIButton. Similarly to UIBarButtonItem you can choose to show the menu immediately of after long-press.
UIButton has property menu since iOS 14 and also showsMenuAsPrimaryAction which is pretty self-explanatory. Set the menu, then showsMenuAsPrimaryAction = true and you menu will appear after tapping on the button.
showMenuButton.menu = menu
showMenuButton.showsMenuAsPrimaryAction = true
Asynchronous UIMenu
Last thing we are going to look at is UIDeferredMenuElement. This exists for cases where we cannot provide the UIMenuElement items right away, but we want to let the user know that something will appear after loading.
While the concept may sounds complex, the actual implementation does not take much. When you create UIDeferredMenuElement there is a single parameter which is a closure, that takes [UIMenuElement].
This means that we need to load the items, construct the menu and give it to the closure. iOS will do the rest. This means it will display placeholder loading indicator and then automatically show the created menu.
There is also caching mechanism built-in, so if user opens the menu multiple times, the items will be cached.
Basic example looks like this:
let asyncItem = UIDeferredMenuElement { (completion) in
      // load menu
}
Of course we don't have to use closure, we can prepare method instead:
func loadMenu(completion: @escaping (([UIMenuElement]) -> Void)) {
        // load menu
}
And then the construction code is cleaner:
let asyncItem = UIDeferredMenuElement(loadMenu(completion:))
For demonstration purposes, we can just introduce slight delay with the DispatchQueue and then see the menu in action:
func loadMenu(completion: @escaping (([UIMenuElement]) -> Void)) {
    DispatchQueue.main.asyncAfter(deadline: .now() + 3) {
        let favoriteAction = UIAction(title: "Favorite", image: UIImage(systemName: "star"), state: .on) { (_) in
        }
        let editAction = UIAction(title: "Edit", image: UIImage(systemName: "pencil")) { (_) in
        }
        completion([favoriteAction, editAction])
    }
}
Let's modify our old menu definition:
let asyncItem = UIDeferredMenuElement(loadMenu(completion:))
let menu = UIMenu(title: "Options", children: [asyncItem, refreshItem, deleteItem])
And now let's see the result:

Conclusion
I think this post covers all the standard usages of UIMenu. It is nice new component which lets you build more modern looking UIs. We went over the basics, item attributes, submenus, "separators", how to actually show these menus on the screen and we also looked at the deferred variant.
Uses: Xcode 12 & Swift 5.3
Follow on Bluesky to not miss new posts

iOS blogger and developer with interest in Python/Django.